
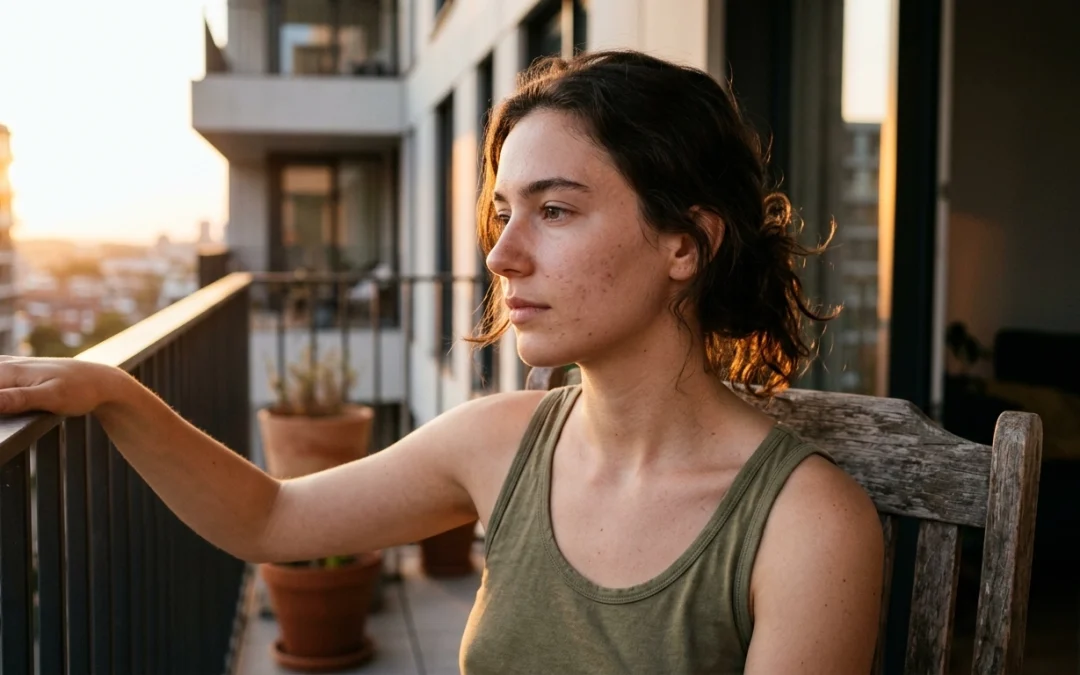
Roseanne glows in the warm, low-angle light of the golden hour, her skin showing every natural pore and subtle imperfection that makes this erotic photography feel raw and alive.
Mastering the art of nude photography isn’t just about having a beautiful model in front of your lens; it’s about how you sculpt that beauty with light. You can have the most stunning woman in the world, but if your lighting is off, the shot will feel flat, clinical, or: even worse: unintentional. High-end erotic photography relies on the interplay between light and shadow to create depth, mystery, and a sense of touch.
If you’ve been struggling to get that "pro" look, you’re likely falling into a few common traps. Whether you're shooting in a minimalist studio or a sun-drenched apartment, these seven mistakes are the most frequent culprits behind mediocre shots. Here’s how to identify them and, more importantly, how to fix them to elevate your fine art nude photography.
1. Using Flat, Frontal Lighting
The biggest killer of mood in erotic nude photography is flat lighting. This happens when your primary light source is placed directly behind the camera or right next to the lens. While it fills in every detail, it also kills the shadows that define the curves of the body. Without shadows, the model's form looks two-dimensional and loses the "wow" factor.
The Fix: Move your light to the side. By placing your key light at a 45-degree or even 90-degree angle to the model, you create a sense of depth. This technique, often referred to as chiaroscuro, allows the light to wrap around the torso, highlighting the hip bone, the curve of the waist, and the texture of the skin. If you find the shadows are too dark, use a white reflector to gently bounce some light back, but never enough to erase the shape-defining shadows.

Shaylene demonstrates the power of side lighting, where deep shadows define the athletic curves of her body, creating a sense of drama and high-end eroticism.
2. Obsessing Over "Perfect" Skin in Post-Production
Many photographers try to fix lighting issues by airbrushing the hell out of the skin in Photoshop. They blur out every pore until the model looks like a plastic doll. This is a massive mistake. In modern nude photography, the goal is a raw, hyper-realistic look. People want to see the subsurface scattering of light through the skin, the subtle sheen of natural oils, and even the tiny imperfections that prove the woman is real.
The Fix: Focus on your lighting quality in-camera rather than "fixing it later." Use a 35mm or 50mm lens with a wide aperture like f/1.8 to get that razor-sharp focus on the skin texture while letting the background melt away. When the light hits the skin at the right angle, it emphasizes the pores and natural texture, making the photo feel tactile. If you need inspiration for natural posing and raw aesthetics, checking out CandyAI can give you a fresh perspective on how digital tools are evolving to celebrate the human form in hyper-realistic ways.
3. Harsh, Undiffused Shadows
While shadows are your friend, harsh shadows rarely are. If you’re using a bare flash or an undiffused LED panel, you’ll end up with "crunchy" shadows that have very sharp edges. This can make the model’s skin look oily and highlight every bump in an unflattering way. It also creates distracting, jagged lines across her breasts or stomach that break the flow of the composition.
The Fix: Diffuse your light. Use a large softbox, an umbrella, or even a simple white bedsheet to spread the light over a larger area. The larger the light source relative to the model, the softer the transitions between light and dark will be. This "wraps" the light around her body, making the art nude photography feel more cinematic and expensive.
4. Losing the "Life" in the Eyes
Even if you’re focusing on a topless reveal or a shot of the model’s legs, the face often remains the emotional anchor of the image. A common mistake is placing the light too high, which creates "raccoon eyes": deep, dark shadows in the eye sockets with no catchlights. This makes the model look tired or disconnected.
The Fix: Lower your light source until you see a small reflection (a catchlight) in her eyes, usually at the 10 o'clock or 2 o'clock position. This "spark" of light brings the model to life and creates a sense of engagement with the viewer. Even in moody, low-light setups, that tiny bit of reflection is essential for high-quality erotic photography.

Scarlet’s gaze is intensified by the soft catchlights from the window, proving that even a subtle light source can transform the emotional impact of a nude portrait.
5. Mixed Color Temperatures
If you’re shooting in a room with a window but you also have the overhead light on, you’re likely dealing with mixed color temperatures. Daylight is blue, while most indoor bulbs are orange. This creates "patchy" skin tones that look amateurish and are a nightmare to color grade. One part of her body might look warm and inviting, while her legs look cold and gray.
The Fix: Pick one light source and stick to it. Turn off all the house lights and use only the window light, or blackout the windows and use your studio strobes. If you must mix them, use gels on your lights to match the temperature of the ambient light. Consistent color is a hallmark of professional how to photograph nude models techniques. You can see many examples of perfect color balance in our tutorials deep-dive where we break down specific lighting setups.
6. Ignoring Background Separation
A mistake that separates amateurs from pros is failing to "pop" the model off the background. If you’re shooting a brunette against a dark wall and you don’t have a rim light, her hair and body will simply disappear into the shadows. The image becomes a "floating head" or a muddy mess where the silhouette is lost.
The Fix: Add a hair light or a rim light. This is a light placed behind the model, angled back toward her, which creates a thin glowing outline along her shoulders and hair. It provides immediate separation from the background and adds a high-end, three-dimensional feel to your nude photography.

Amber is perfectly separated from the dark background thanks to a deliberate rim light that traces the elegant curve of her back and the texture of her hair.
7. Overcomplicating the Setup
Many beginners think that more lights equal a better photo. They’ll have a key light, a fill light, two rim lights, and a background light all going at once. The result is usually a confusing mess of shadows and highlights that compete for the viewer’s attention. It’s hard to tell where the focus should be, and the natural beauty of the woman gets lost in the "production."
The Fix: Start with one light. See how it falls across her body. Only add a second light if you have a specific problem to solve: like a shadow that's too dark or a lack of background separation. Most of the best fine art nude photography is done with just one or two lights. It keeps the focus on the model and allows the shadows to tell the story.
Lighting is a journey, and every body reacts to light differently. If you want to see these concepts in action and learn from the best in the industry, the best step you can take is to sign up for the Fine Art Nude Club membership. You'll get exclusive access to thousands of high-resolution galleries and video tutorials that show exactly how to pose and light models like Roseanne, Shaylene, and Scarlet to achieve that raw, erotic perfection every time.